Stayin’ Alive: How to Cheat Death When Kicksledding

Bad news, dude – your mom called. She heard you were kicksledding with your dog… and you didn’t wear mittens outside in the cold. She has some concerns about the safety of this sport and really sounded worried, so I promised her I’d talk to you before you head out on your kicksled.
I’ve been doing this sport for more years than I’d like to admit; I’ve made all the mistakes and mishaps so you don’t have to end up in the emergency room. Whether you’re just starting out, or you’ve been at this for a few years, here are some safety tips to cheat death… and enjoy the sport responsibly.
Related: Dogs Get A Kick Out Of Kicksledding
Assembly Required
Not all kicksleds are designed equally, and on top of that, most kicksleds are not designed for dog power. Yep, you read it right; Kicksleds are not designed for dogs to pull, they’re designed to be kicked! (Makes sense, that’s why they are called kicksleds.) But, with a few modifications to the sled, you can rig it up for dog power. Kicksleds that can be modified for dog power include the Elsa T-series, which come in a variety of heights for different users. There are a variety of sleds models suitable for dogs, because they’re long enough to track well, yet flexible enough to handle turns. Avoid stiff, short sleds, as they don’t track well or steer well.
Dog-friendly kicksled modifications include attaching a bridle to the stanchions, and feeding the bridle up through rings attached to either side of the brush-bow. If you only attach the gangline to the brushbow, you won’t have the same control the sled on turns. It’s simple physics. And when you don’t have control on the turns, your mom gets anxious!
Size Matters
Kicksleds come in a variety of heights, lengths and weights. A lighter sled will be much easier to mush with. A longer sled will track better and give you more control on the turns. The height of a sled will make a difference between walking upright and lying immobile on the couch with a bad back for a week. If possible, rent a sled or at least take it out for a test drive before you buy it.
Maintain Your Ride
Once you have the proper sled, take care of it! Over time, wood breaks, metal bends, bolts and screws become loose, and rope gets worn. Get in the habit of checking your sled out before you go for a ride, because I can tell you from experience, limping home on a wooden sled isn’t fun!
Before heading out on your kicksled, give it a once over; look for cracks, fraying on the bridle, and that all of the bolts are tight. A little regular maintenance goes a long way to ensuring you have an excellent and safe time out on the trail.
Related: Exhilarating Workouts For You And Your Dog
Wear a Helmet
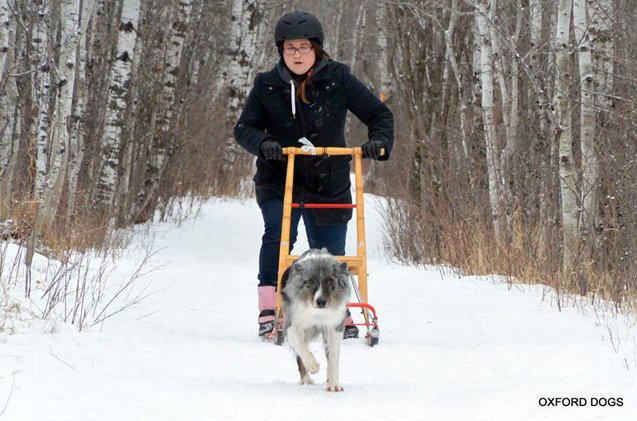
If you have a brain in your head, it’s worth protecting. A helmet is a necessary safety precaution when out on the sled, because that’s when unexpected things happen. Hmmm, I guess that’s why they’re called “unexpected.” You never know if a deer suddenly jumps out of the bush, a squirrel tempts your dog off the trail, or you hit a bare patch headed down a hill.
Do I sound like your mother yet? “Nag. Nag. Nag. Wear a helmet! Why aren’t you wearing the mittens I knitted for you?!?” Still not convinced? Then think of it this way: when you crash into a tree and end up in the hospital with a concussion or a broken neck, who will take care of your dogs? Exactly. Wear a helmet.
The best helmets for kicksledding are winter sports helmets, often sold for snowboarding. They come in a wide range of colours and styles, and there’s a helmet to match any budget. Winter sports helmets are made of a plastic, which is less likely to shatter in the cold. They also come with a good deal of insulation and are surprisingly comfy to wear. Depending on your climate, you not likely need to wear a toque under your helmet… yes, they’re that warm!
FYI: you’re not covered with a bike helmet. Bike helmets are designed for warmer weather and crashes on bikes where you flip over the handlebars. There’s a chance that you can flip over the handles of your sled, but you’re more likely to fall off the back of it. Most bike helmets aren’t designed to offer protection to the back of your skull. As well, they’re made of a stiffer plastic, so they’re unsuitable for kicksledding.
I’ve seen kicksledders bail over the handles, crash sideways into the snow or fall backwards on a quick take off. A proper fitted helmet will come down just a few finger widths above your eyebrows to protect you from front flips. It needs to come down the back of the skull, and offer ample protection down over the ears. It’ll also come with an adjustable strap – to ensure a good fit, nod your head and shake your head back and forth. The helmet should stay in place, no matter how much you move. If it jiggles during your bobble head impersonation, it’s too large.
Invest in a quality, properly-fitted helmet – your life depends on it!
Choose a Safe Trail
Designated kicksled trails are few and far between. Generally kicksledders opt for multiuse trails that are closed to motorized vehicles. With your helmet on, it might be harder to hear what’s going on around you. Even if the trail is designated for non-motorized vehicles, be alert and aware of your surroundings. And multiuse usually means maintained, so it’s been plowed – anyone who enjoys the sport appreciates a plowed trail!
The trail you run on needs to have had time to freeze, as well as enough snow to cover up any debris. A desirably frozen trail will allow the sled to easily slide across the snow, and the absence of debris means you won’t do damage to your sled or make any sudden stops
Stay off of cross country ski trails. Cross country skiers are usually a well-mannered and polite group, but running your kicksled on a cross country ski trail is no way to make friends. Don’t test their patience. These trails are usually clearly marked, complete with signage warning people to keep their dogs away. Pay attention to the signs – dogs seriously wreck the trails and ruin the skiing trails for everybody. Not cool!
Tell Someone Where You’re Going
In the winter, trails see a lot less traffic than they do in the summer time, so the chance of help happening by is greatly reduced. Add to that the cold factor, and even a minor glitch can become a big deal with the threat of hypothermia looming. Always tell someone where you will be going and what time you expect to be back. That way, if you run into trouble, you know that a rescue crew is on standby. It doesn’t have to be your mom, but it should be someone who’ll come out looking for you in the cold if you don’t come back by a certain time.
Learn to Bail Safely
You’re going to bail. It’s not an IF, but a WHEN… and it will be epic. Failing for failure means you’ll be in control of your fall, so you, your dogs, and your sled all get out of this alive. There will be times when you get into trouble and simply jumping off the sled is not an option! An upright sled, being pulled by a dog is a danger to the dog and everyone else around. A sled in this situation can hit the dog or another trail user.
To practice bailing on your kicksled, start by slamming the sled over sideways when you are about to lose control. Take your kicksled to a flat, wide trail without the dog to start. Give it a few kicks to get going; staying on your feet, push the sled ahead of you, while forcing it over sideways. As you push it away and to the side, stay on your feet in order to quickly recover the sled. It’s not foolproof method, but a sideways sled is much easier to stop than an upright sled, and isn’t going to hurt your dog or anyone else out on the trail. Of course, not bailing is always the preferred and safest option, but if you need bail, be responsible.
Don’t Take More Dogs Than You Can Handle
Classic rookie mistake, most often committed by people who don’t think they’re rookies anymore. Once you get the feel of running a dog on a kicksled you’re going to want to add some more dogs – you feel the need for speed! You add a second dog, and things are going well. Then you add three or four, and that’s where you get into trouble. Kicksleds are great for one or two dogs to pull. Any more than that, you’ll want to get yourself a dog sled, because it comes with brakes. Kicksleds don’t have brakes, and while you can modify it with a drag mat or a brake, you’re going to have trouble stopping a determined team of dogs from chasing that rabbit out on the road. Stick to a number of dogs you can realistically handle if you encounter the unexpected. Take it from me – you will encounter the unexpected.
Wear Appropriate Clothing
In addition to clean underwear (remember what your mother always says about the subject), you need to dress for the weather. Kicksledding requires active participation, so you will be kicking! Plan to dress in layers, which can be added to or removed as the need arises. You are going to be sweating – a base layer that wicks the moisture away from your body is going to keep you drier and safer from the risks of hypothermia. Aim for dressing about 10 degrees warmer than the actual temperature to account for your body generating more body heat.
Finding proper shoes for kicksledding can be a little tricky. You need shoes that are warm enough to handle the trail, but still able to offer freedom of movement for your feet. A hulking pair of winter boots will certainly keep you warm, but feel like concrete blocks when kicking in them. Running shoes are ideal for athletic pursuits, but often get wet, leading to cold feet.
I suggest you use a quality pair of hiking shoes, with winter sports socks on underneath. The hikers will offer you traction for kicking and stopping, and the winter sports socks will wick moisture away, which will keep your feet warm.
Have fun out there and tell your mom not to worry – you’ll play safe AND you’ll be wearing the mittens she knitted for you!

Kevin Roberts lives for adventure. Together with his pack of rescue dogs and his husband, he spends as much time outdoors as possible. Kevin lives by the motto: "Get outside and play with your dogs!
More by Kevin Roberts


