

Lifesaving Steps on How to Perform Dog CPR

Cardiopulmonary resuscitation, better known as CPR, is a lifesaving technique that most can learn and perform during cardiac arrest emergency. However, 70 percent of Americans feel helpless in this kind of a situation because they don’t know how to administer CPR or their training has significantly lapsed.
While there are thousands of courses that teach how to perform CPR on humans, there are significantly less that teach how to perform this life-saving technique on man’s best friend. Should you encounter your (or anyone else’s) dog in cardiac arrest, here are the necessary steps in order to asses if you should administer CPR and how to do it.
You can feel for air by holding your hand close to his nose while watch for the chest to rise and fall. If the dog is not breathing, his airway may be blocked. Pull his tongue as far forward as possible and remove any objects present in the throat or mouth.
The easiest way to find a dog’s pulse is in femoral artery, which is located in a dog’s inner thigh. This artery is located where the leg meets with the body. Use your fingers (not your thumb, as it has its own pulse) to check his pulse by pressing down gently. If you can’t find a pulse here, try just above the middle pad of your dog’s front paw. Lastly, you can try to find a pulse by pressing your fingers directly over the dog’s heart. To check using this method, your dog needs to be lying on his left side, with the front left leg bent so the elbow touches the chest. The dog’s heart will be where the elbow touches the chest.
If your dog has a pulse, but isn’t breathing, DON’T perform CPR but DO perform artificial respiration (mouth to snout resuscitation, more on this below). If your dog does not have a pulse, you need to perform CPR, which is a combination of artificial respiration and chest compressions.
DO NOT practice CPR on a healthy dog, as it can cause seriously injuries.
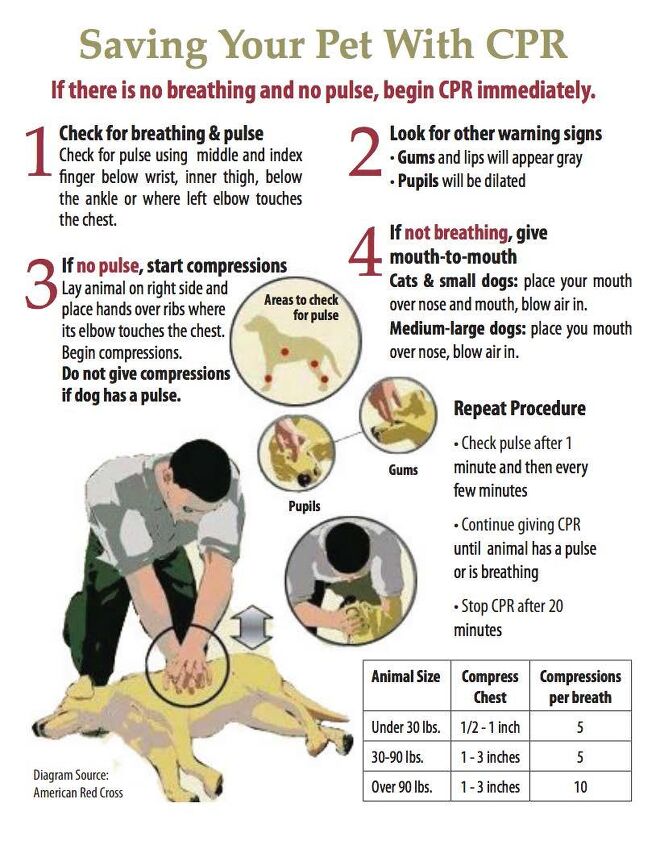
First, you need to lay your dog down on a flat surface with his right side down. Straighten his neck and head in order to open his airway as much as possible. Next, pull his tongue out as far forward as possible so it rests against the back of his teeth, and shut his snout.
Position yourself behind the dog and find the heart to begin compressions. To do this, place one palm over the other on top of the widest part of his rib cage (this is near the heart, but not directly over it). Should the dog weigh less than 30 lbs, cup your hands around the dog’s rib cage and place four fingers on one side of the chest and your thumb on the other side
To begin compressions, keep both of your elbows straight (for dogs over 30 lbs.) and push down on the rib cage using quick, firm thrusts. Remember only to compress to a depth of 1/4 to 1/3 of the dog’s chest width. Repeat at a rate of 15 compressions per 10 seconds. If the dog is under 30 lbs, use your thumb and fingers to squeeze the chest (using the 1/4 to 1/3 chest’s width depth ratio), and perform 17 compressions every 10 seconds.
Your dog’s best bet for survival is to perform both CPR as well as artificial respiration if he does not have a pulse. After 10 seconds of CPR, you should begin artificial respiration (mouth to snout), and then return once again to CPR.
1. Seal your dog’s lips by placing your hand over the dog’s muzzle and ensuring his mouth is closed. Place your mouth over the dog’s nostrils and blow gently, keeping an eye on his chest for the rise of your breath. If it doesn’t rise, blow harder and make sure his mouth is properly sealed. If the dog is small, cover his entire muzzle with your mouth.
2. Remove your mouth from the nose/muzzle area to allow the air to return. Give one breath for every 15 compressions if you are administering CPR by yourself. If you have someone to help, one can perform compressions while the other gives mouth-to-snout respiration (1 breath after every 5 compressions).
If your dog has a pulse, but isn’t breathing, you should administer one breath every two to three seconds at a pace of 20-30 breaths per minute until they are responsive or emergency help arrives.
Related: New Florida Law Allows You To Break Into Cars To Save Dogs
Another way to help your dog’s heart start beating is by performing an Abdominal Squeeze. Put your left hand under your dog’s abdomen and your right hand on top of it. Push down to administer one abdominal squeeze. This helps the blood circulate back into the heart. Perform one abdominal squeeze after a set of 15 compressions and one breath.
You must perform all three – artificial resuscitation, chest compressions and abdominal squeeze – for the best chance of success. The correct format for dog CPR is 15 chest compressions per 10 seconds, then one breath, followed by one abdominal squeeze. Repeat until necessary.
Continue CPR until your dog starts breathing on his own and has regained a steady pulse. If after 20 minutes you’re unable to successfully resuscitate the dog, it’s not likely you’ll be able to save them. But if they do regain consciousness, keep them laid down and relaxed for a few minutes, as they will be disoriented.
No matter what, bring your dog to a local veterinarian so they can look him over for any injuries, as CPR is known to break ribs, cause pneumothorax (collapsed lung) and stress your dog’s body. Don’t worry about causing these injuries while performing CPR – they’re treatable once your dog’s heart starts beating again.
To learn more about dog CPR, talk to your veterinarian and sign up for a dog CPR class. You’ll never know when these skills can mean the difference between life or death.
[Source: American Red Cross]
More by Diana Faria